I originally bought this truck around March 2001 from a dealership in Fort Collins, CO. I traded my 1993 Z28 for it which I'd been trying to sell for months with out any luck. The truck had 54K on the odometer when I bought it. It had some slight evidence of rust on it but my excitement of finding a truck like this, with low miles and in good condition otherwise blinded me to the rust. Maybe I'd been in Arizona for too long where rust is not really an issue and had forgotten about how rust can ruin and otherwise nice vehicle. Anyway, considering the rust, I probably paid too much for the 'Burb.
My employer has as one of it's benefits a "sabbatical program" where once every 7 years employees get an additional 7 weeks vacation time which you are required to take all at once. Pretty nice, huh?. During the sabbatical I was also going to move back to Arizona from Colorado which meant I'd have even more stuff to haul around. Since I was eligible for my sabbatical in 2001, and we had been planning for years to do a USA tour we needed something big to haul camping gear, clothes, some food, etc to last for nearly three months (sabbatical + vacation + extra time to move). Also, Intel would only move a running car. At the time the Trans Am had a motor just sitting in the motor mounts but otherwise not hooked up and no tranny. This meant I had to buy a trailer and move the car myself. The Suburban was perfect as a tow vehicle/vacation vehicle although gas was expensive for the nearly 30,000 miles we drove.
Here's the codes from the glovebox:
![]()
and here's what the translate to:
AA3 : WINDOW, TINTED, DEEP TINT, ALL EXCEPT W/S, F.D.,
AK9 : RESTRAINT SYSTEM, RR SEAT, SHLDR, RETR, 3 POINT
AS3 : SEAT, RR, SUBURBAN
AT5 : SEAT RR, CTR, FLDG
A31 : WINDOW, POWER OPERATED, SIDE
A95 : SEAT, FRT BUCKET, HIGH BACK, PASS & DRIVER RECL
BC3 : ORNAMENTATION, INTR, I/P, DELUXE
BY1 : ORNAMENTATION, EXTR EMBLEM, BODY, VAR 3
B85 : ORNAMENTATION, EXTR MLDG BELT REVEAL
B93 : ORNAMENTATION, EXTR MLDG, DR EDGE GUARD
B96 : MOLDING WHL OPENING
CD4 : WIPER SYSTEM WINDSHIELD, PULSE
CMD: not listed
C5W : GVW RATING, 7000 LBS
C60 : HVAC SYSTEM, AIR CONDITIONER FRT MAN CONTROLS
DK6 : CONSOLE ROOF, INTERIOR
D1G : GEAR, SPEEDO DRIVEN
D45 : MIRROR O/S, SST
E5Z : SPEEDOMETER ADAPTER (DELETE)
E6Z: not listed
E9Z : SPEEDOMETER KEY (DELETE)
GT4 : AXLE REAR, 3.73 RATIO
G80 : AXLE POSITRACTION, LIMITED SLIP
JB5 : BRAKE, POWER, DISC/DRUM, 6400 LBS
KC4 : COOLING SYSTEM, ENG OIL
K34 : CRUISE CONTROL, AUT0MATIC, ELECTRONIC
K60 : GENERATOR, 100 AMP
L05 : ENGINE, GAS, B CYL, 5.7L, 1 TBI, V8
MD8 : TRANSMISSION, AUTO 4 SPD, THM 700 R4
MXO : MERCHANDISED, TRANS, AUTO PROVISIONS, O/D
NA5 : EMISSION SYSTEM, FEDERAL, TIER O
NE2 : FUEL TANK, 151L, 40 GAL
NY1 : SHIELD, FUEL TANK
N33 : STEERING COLUMN, TILT TYPE
N90 : WHEEL, 15 X 7,ALUMINUM CAST,4.75 INCH BOLT CIRCLE (I think this is wrong. It should be 6 on 5.5"
SLM: not listed
TR9 : LAMP, GROUP
TT4 : HEADLAMPS, HALOGEN, 4
T63 : ALARM, HEADLAMPS ON WARNING SYSTEM
UA1 : BATTERY, HEAVY DUTY
UM6 : RADIO, AM/FM STEREO, SEEK/SCAN, AUTO REV CASS,
UN9 : RADIO, SUPPRESSION EQUIPMENT
UP8 : STEREO RADIO INSTALLMENT PROVISIONS
UY7 : WIRING HARNESS, TRUCK TRAILER HD
U73 : ANTENNA, FIXED, RADIO
VE5 : BUMPER, FRT & RR, IMPACT, CHROME
VG3 : BUMPER FRT, IMPACT STRIP
VG5: not listed
VR4 : TRAILER HITCH, WEIGHT DISTRIBUTING PLATFORM
V02 : RADIATOR, HEAVY DUTY, WITH TRANS OIL COOLER
V22 : GRILLE, CHROME, RADIATOR
V73 : ANTENNA, FIXED
V76 : HOOK, TOW
XHB: not listed
X6Z : HUB, LOCKING AUTOMATIC
YD3: not listed
YD5: not listed
YD6: not listed
YG3 : ORNAMENTATION, BODY SIDE 6 WHL OPENING BRIGHT
YHB: not listed
ZHB: not listed
ZQ2 : SALES PACKAGE, DRIVER CONVENIENCE
ZW9 : B0DY EQUIPMENT, BASE BODY OR CHASSIS
ZY4: not listed
Z75: not listed
Z82 : TRAILER PROVISIONS, SPECIAL EQUIPMENT, H.0.
24D : TRIM COMBINATION, CLOTH, DK BLUE (D) (91)
24I : INTERIOR TRIM, DK BLUE (I) (91)
27A : STRIPE COLOR, ACCENT, TW0 TONE, LT BLUE/DK BLUE
27U : PRIMARY COLOR, EXTERIOR, LT FRENCH BLUE MET (91)
96L : SECONDARY COLOR, EXTERIOR, DK SMOKE GRAY MET (91 )
24D : TRIM COMBINATION, CLOTH, DK BLUE (D) (91)
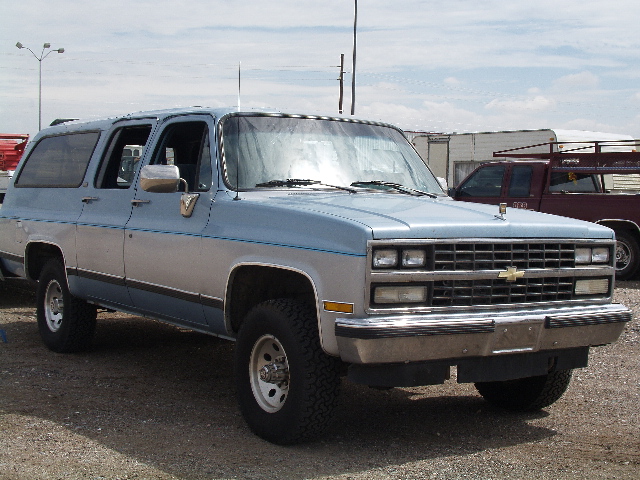
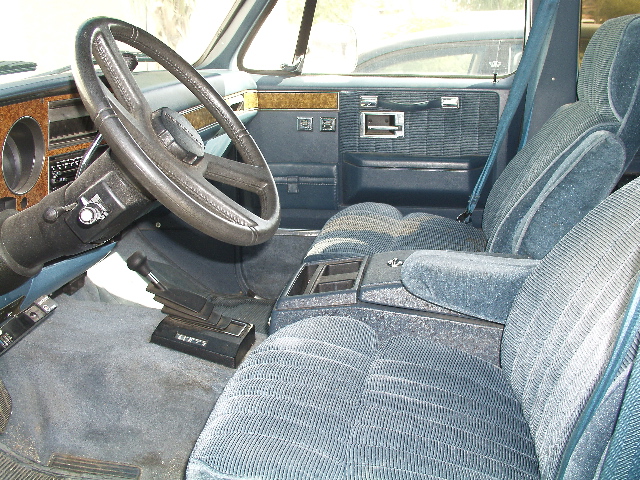
A Few Pictures of the Truck


Almost immediately as soon as I bought the Burbn, the paint started peeling off the roof and cowl. Since it started almost immediately I had always suspected that the dealership I bought the truck from had sprayed a coat of paint on there to make a quick sale.
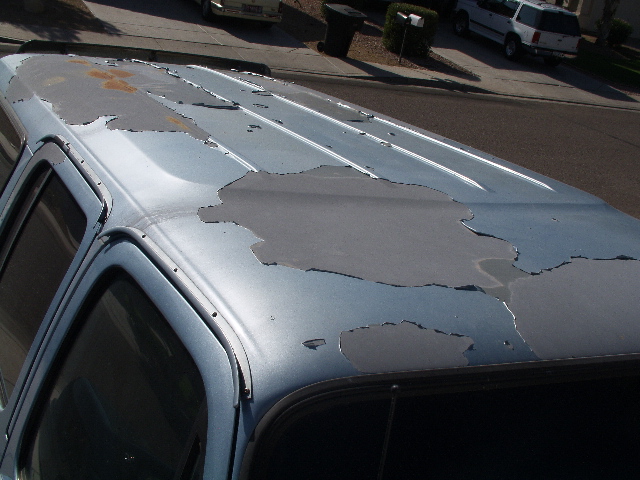


Yeah she's got some. Could be worse.


Starting the Rebuild


Wish List/To Do:
New paint (see below)
Fix Burbn overheating problem (DONE)
Better motor
New tail pan (New tail pan from LMC in box in the garage)
Rocker panels?
Rear cargo area mat
Roof rack?? (or maybe hitch mounted rack??)
Light setup for working on car in pits
Lights for front
Nice stereo
CB radio (Cobra)
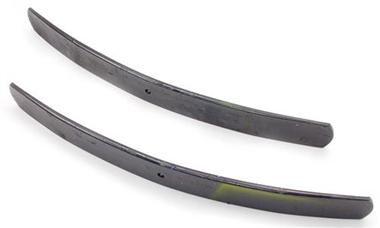
Tow-ready rear suspension (New Add-A-Leaf ordered 1/30/10)
¾ ton suspension
Rear disk brakes
Barn door windows tint
Raise it about 4”
Better bumpers
Fix driver’s side mirror (DONE)
Bigger wheels/tires (new RockCrawler 15: wheels and 33" tires ordered 1/30/10)
Would like to add recessed D-rings inside the rear of the Suburban as tie down points
Sept 19, 2005: Long time no update :-). I haven't done anything on the paint of the Burbn for a long time. I've been very busy. In the meantime, the spots where the paint has flaked off and and has started rusting. the top which I primered over a year ago has surface rust coming through. I scraped a wall on a fishing trip at the pond in Johnson Ranch. That wiped out the right front side marker light and scraped up the right front fender pretty good. About two months ago the radiator sprung a leak. I bought a new radiator from Mesa Radiator. I had the guy at West Coast Tire (next door to Mesa Radiator) replace the AC compressor and do a retrofit to the other coolant. I also replaced the thermostat. Truck was still overheating and you couldn't run the AC. The guy at West Coast Tire told me the fan clutch was bad. I had replaced that less than six months earlier. I also picked up a radiator overflow tank because I noticed the original one in the truck was cracked and leaking. I got a new one at Chapman Chevrolet for about $19. After mounting it I noticed it has a very small leak also.
I finally got tired enough of the overheating to do something about it. I called Chapman Chevrolet and talked to a parts guy who told me that all Burbns were reverse flow (as far as fan clutch goes anyway) from '87 on up. That would explain my overheating and non-functional new fan clutch. So I went to Checker and bought a new "correct" (haha) fan clutch. Turns out it was not the right one after all. The holes in the fan blade was smaller than the mount point on the fan clutch. I ground out the hole in the fan and ground down the perimeter of the fan clutch fan mount point. Then the bolts which bolt the fan to the fan clutch were different sized so I found some with the correct threads and cut them off. Everything went together eventually. Took it for a hard drive around the block with the AC blasting and then came back and let it idle for about 10 minutes. The temp never even got up to the first line. I could also hear the fan blowing more air. I think this problem is solved. I also picked up a radiator overflow tank because I noticed the original one in the truck was cracked and leaking. I got a new one at Chapman Chevrolet for about $19. After mounting it I noticed it has a very small leak also.
October 10, 2006: Since last update I've done quite a bit. The entire truck is now "royal blue". Still looks like crap but a better grade of crap. I also changed out the drag link. The old one was so sloppy I was worried it would break at any time. Hmm, what else, ...
July 4, 2008: Getting the bug again to make the Burbn bigger, better, badder. Saw a buildup of a 3/4 ton Burbn (in Queen Creek believe it or not) that does a lot of interesting things. The buildup thread is here. For documentation purposes let me note I spent $1300 last August on the A/C system. The entire system is new now and converted to non-freon.
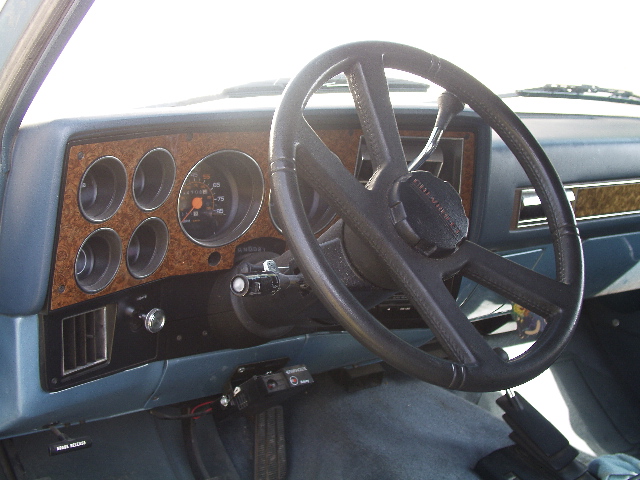
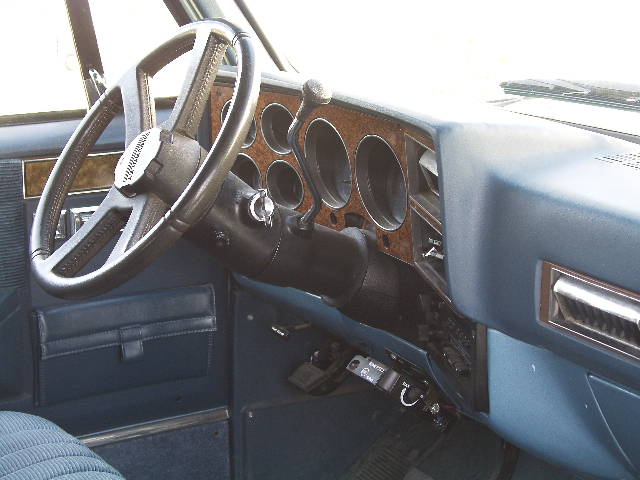
Jan 11, 2009: Quick update. The hood is now flat black. That's the best looking part of the truck right now :) I took out the 80s style wood grained dash and strip running across the dash pad and painted them satin black. While I was at it I also painted the fake plastic chrome a/c outlets and some fake plastic chrome trim. Looks much better in my opinion.
Sept 8, 2009: Today I almost sold the Burbn. A friend of a friend wants to buy it bad. I almost bit. In fact I was going to bring it to the house for this guy to look at and probably buy when I saw that both front tires were coming apart so bad it's not drivable.
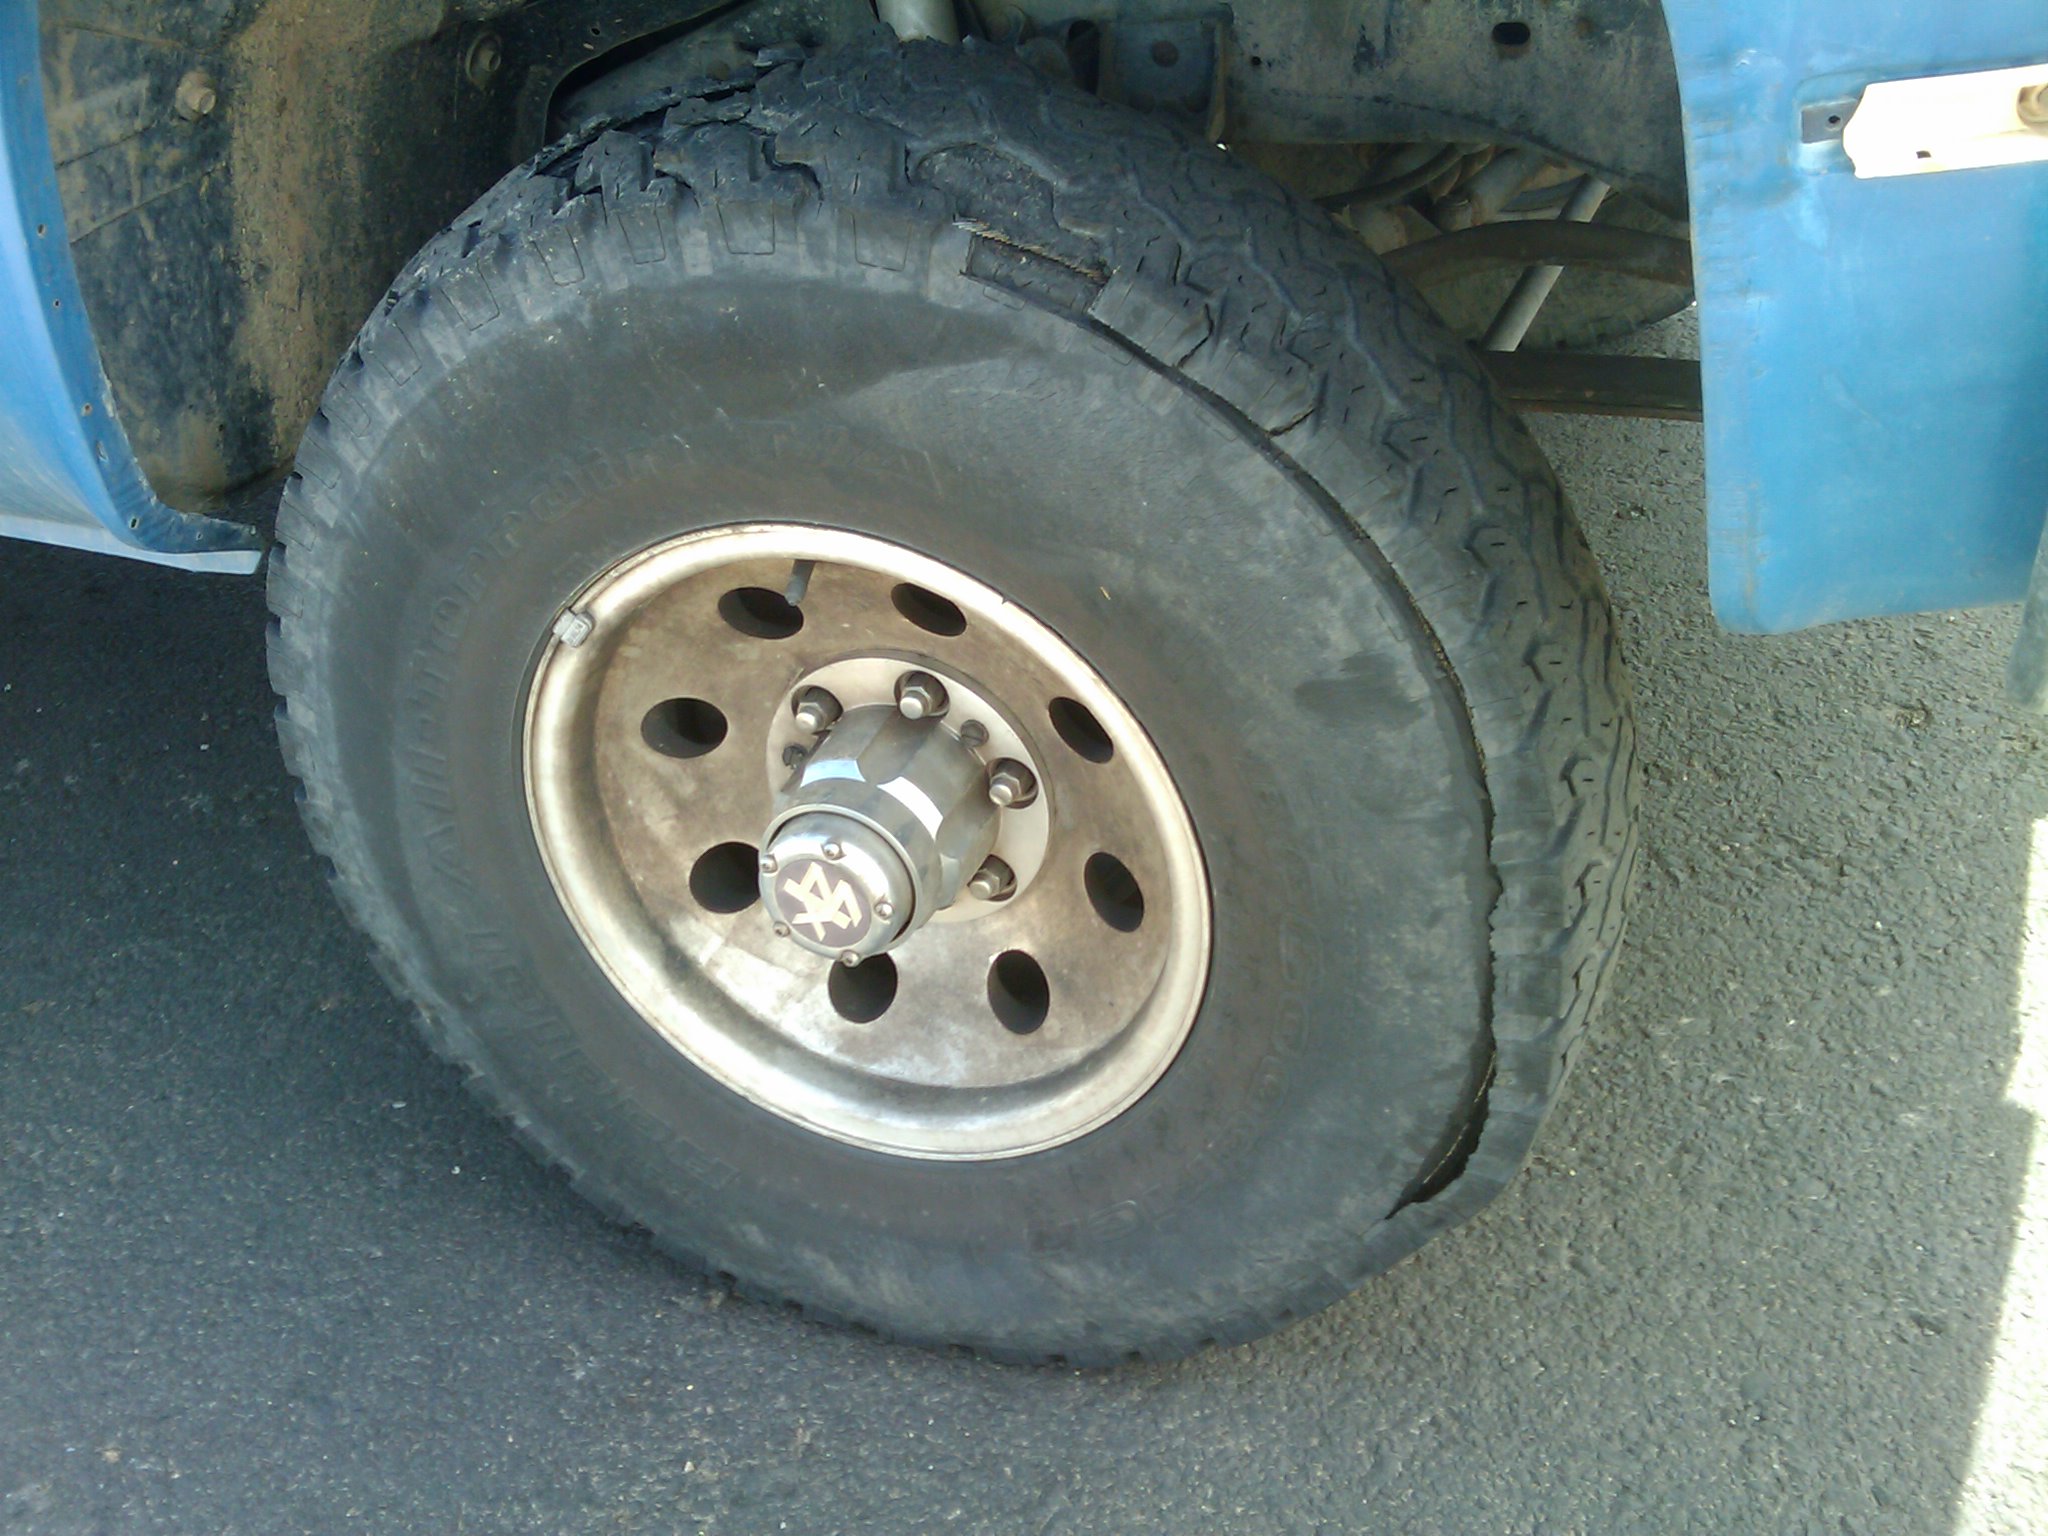
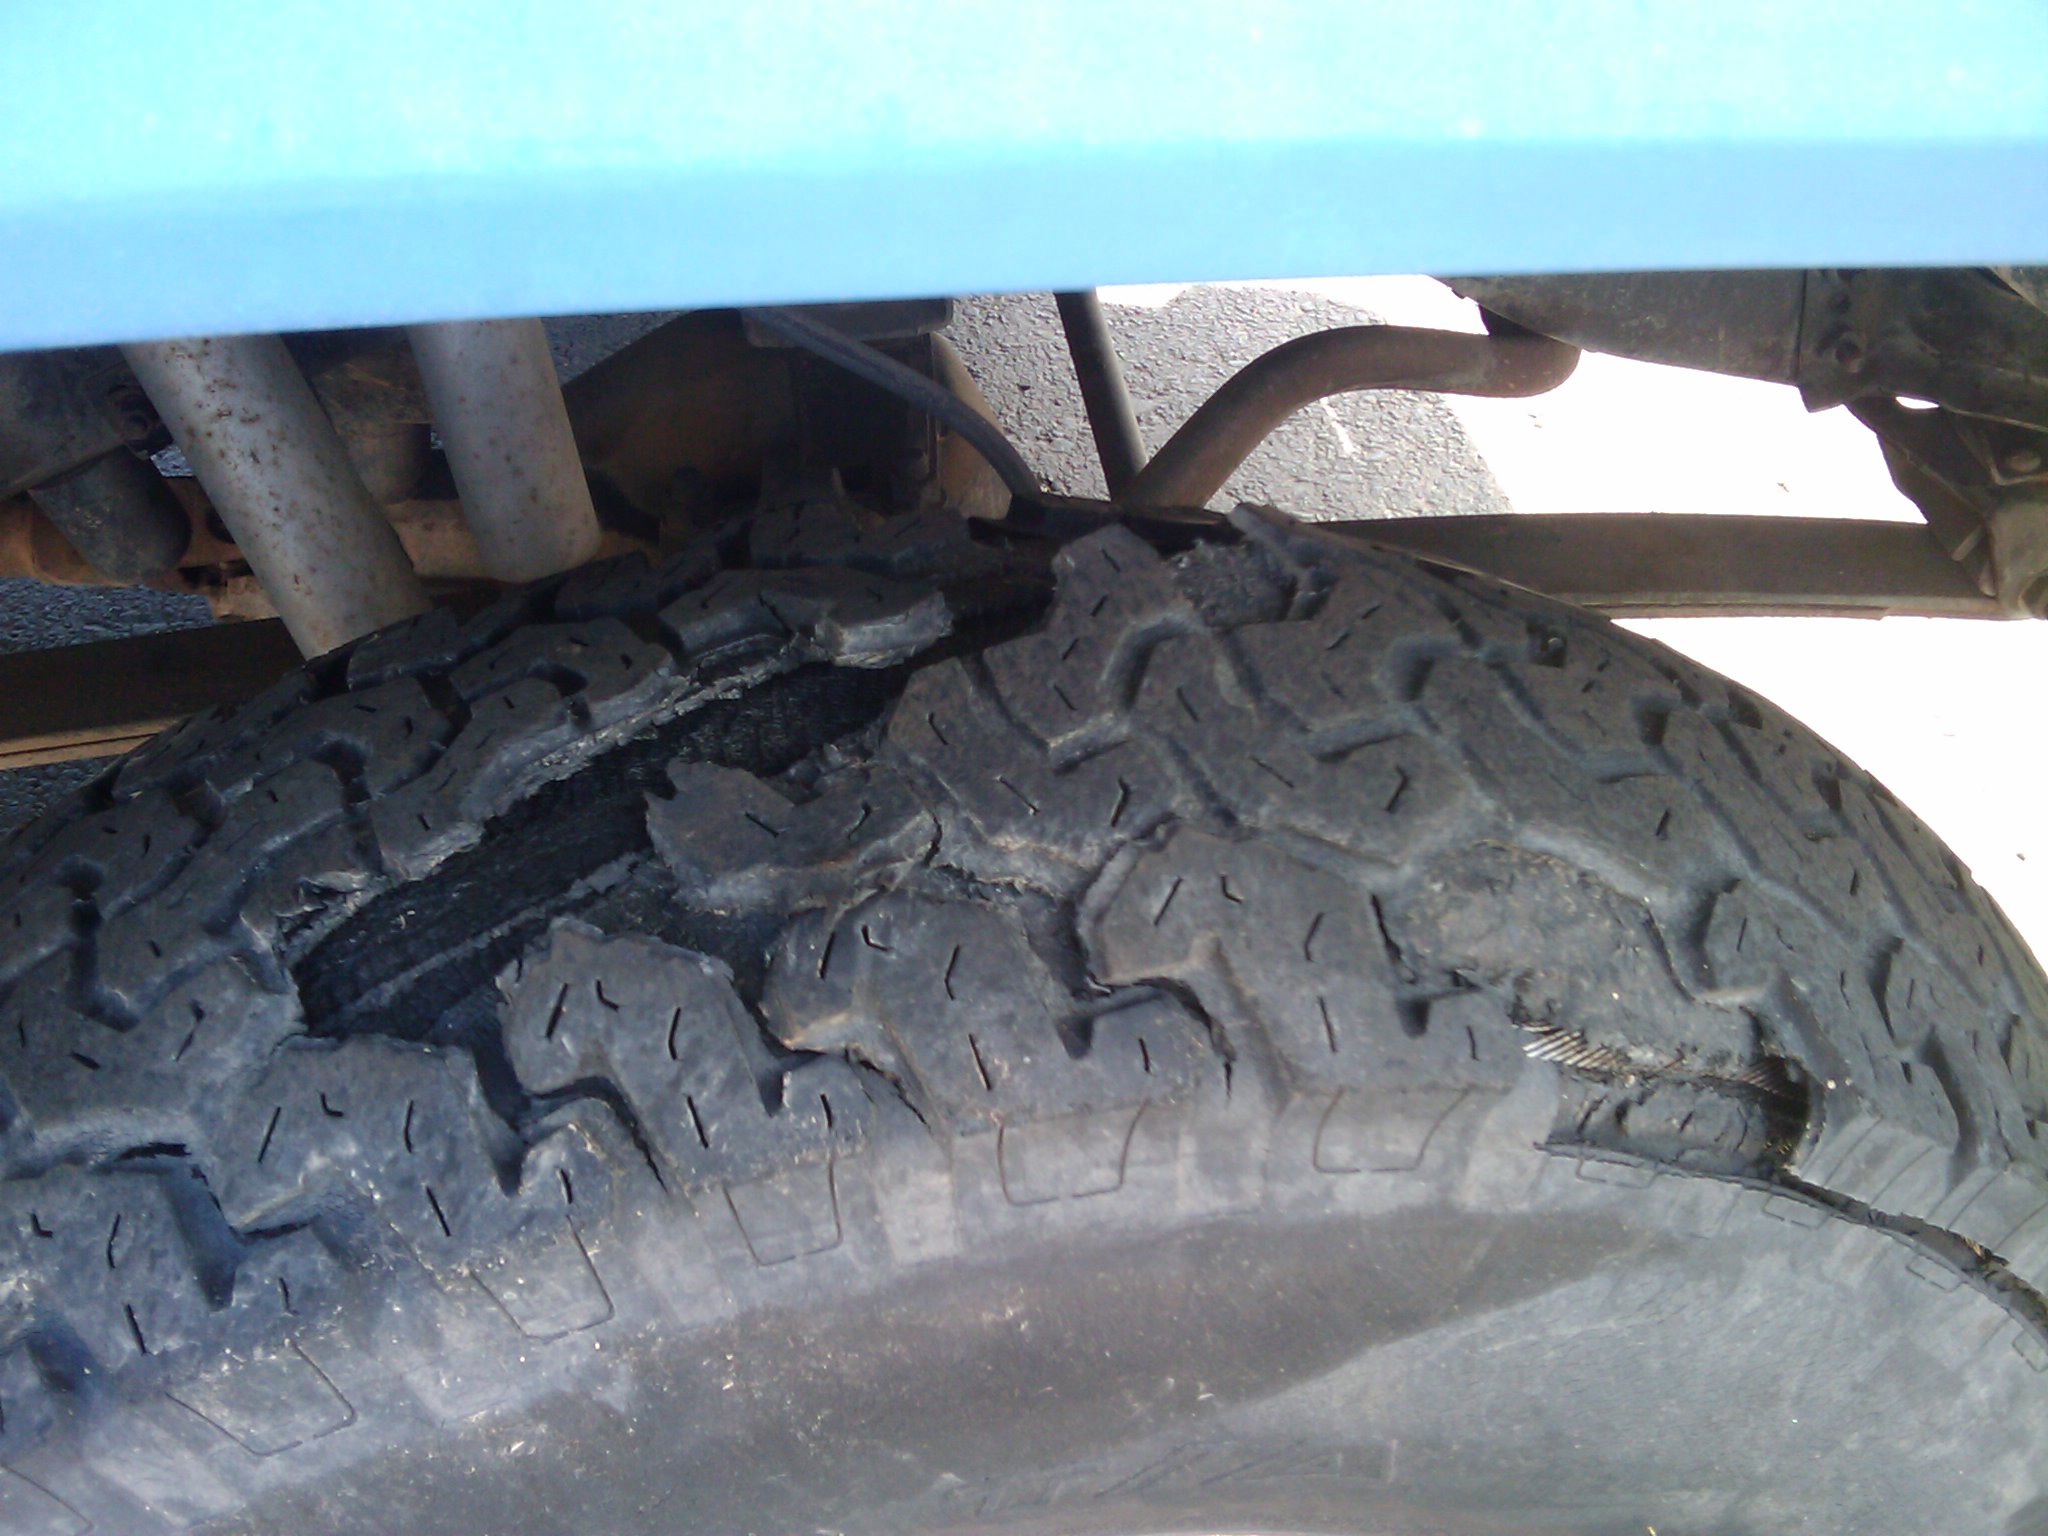

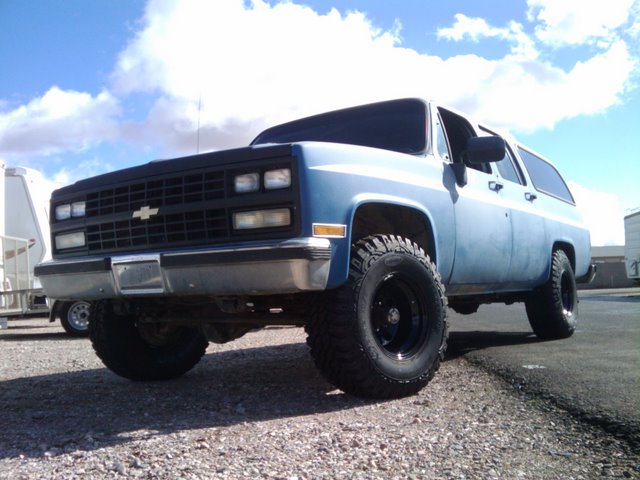
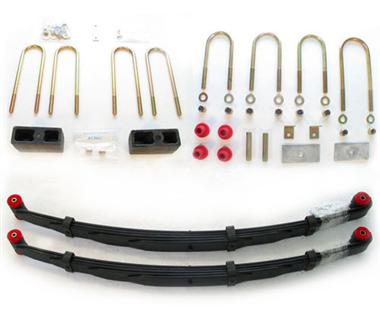
The short bit I did drive it convinced me it's too nice to sell - even with the crappy paint job so I'm going to keep it. I also saw a '91 GMC Burbn on the way to pick mine up with 3" lift, 33" tires, crappy paint (better than mine but still bad), etc and 135K miles for $3K. With a decent paint job, 4" lift and 33s mine would be a better truck. I found a 4" Rough Country lift kit for $319 (see below). Paint job could be had for $1K and 33" (or 35s :) wheels/tires for ~$1100.
Jan 30, 2010: Today I ordered 15x10 ProComp black steel wheels (3.75" b/s), 33x12.5R15 Xtreme M/T tires and Add-A-Leafs for the rear springs. This should be nice. They won't be in for a few days but will post before and after pics. The add-a-leafs will probably be fun since every bolt I've ever removed from the 'Burb has been rusted but I'm sure I'll manage.
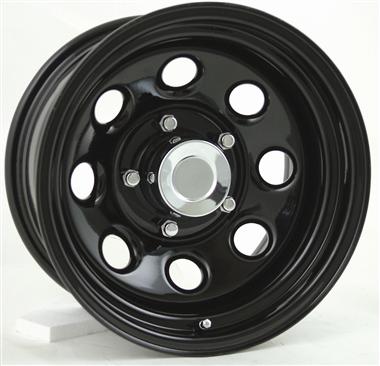
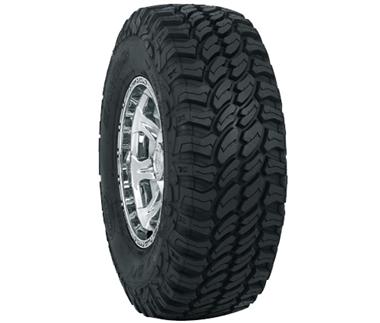
Feb 6, 2010: Installed my new wheels and 33" tires today. Looks so much better. The front fenders rub some when I turn hard. Looks like that 4" lift kit is a necessity.

Aug 28, 2010: Since I have decided on the lift kit now thinking about additional power needed for bigger tires. Also, want to make the truck a more capable tow vehicle for my car hauler with T/A and possible for hauling my travel trailer around some.
Here's the lift kit I will soon order: http://www.suspensionconnection.com/cgi-bin/suscon/147304.html
A lot of good info on this site: http://tbichips.com/truckmods.htm
Heads: http://www.competitionproducts.com/prodinfo.asp?number=10024364A Better(??) --> world products torker heads
Exhaust: Cat back (may work): http://www.summitracing.com/parts/WLK-17324/?rtype=10 Another (may work): http://www.allexhaust.com/flowmaster/4943.html Another (3" dual outlet): http://www.jcwhitney.com/3-dual-exit-cat-back-exhaust-systems/p2010227.jcwx?skuId=422021&TID=BEC00001&zmam=15972153&zmas=21&zmac=61&zmap=344159
?? Will a 3" cat-back kill low end torque? Not good if true for towing...
Headers: http://www.summitracing.com/parts/BIG-11504FLT
Y-Pipe: http://www.summitracing.com/parts/BIG-11504YFLT
Cat: http://cgi.ebay.com/ebaymotors/3-0-Catalytic-Converter-High-Flow-Universal-DynoProven-/110575792132?pt=Motors_Car_Truck_Parts_Accessories&hash=item19bed4b004
Intake: ../../images/EDL=3704-JY.jpg at Summit for $251 http://www.summitracing.com/parts/EDL-3704/
Cam: comp cams 12-249-4 http://www.summitracing.com/parts/CCA-12-249-4/ Chip: http://cgi.ebay.com/ebaymotors/Custom-CHIP-KIT-87-88-89-90-91-92-Chevy-Truck-TBI-350-/400131568968?pt=Motors_Car_Truck_Parts_Accessories&hash=item5d29b33548
Sept 2, 2010: I have spent several days trying to get the Burbn started. At first I thought it was due to gas going bad since it hadn't been started for a couple of months. I thought maybe the injectors were stuck/clogged. I removed the fuel inlet into the throttle body and there was no fuel i here, bone dry. I removed the fuel filter and turned the key on and gas was only trickling out so I'm pretty sure the fuel pump is bad although I've not actually checked the pressure. I think I will get this EP381 fuel pump from TBI Chips. This is a 60psi pump but works fine at the lower pressure (~12psi) of the TBI. This will also support up to 400hp. Will have to drop the fuel tank to do this. What makes this a much bigger challenge is that the Burbn is sitting in a storage lot about 10 miles from my house and it is still 100-105 F most days.
Oct 15, 2011: No change on the Burbn since the last update. I bought a '92 Yukon which has been taking my attention. I haven't given up on the Burbn but am frustrated and with it parked 10 miles from my house it is tough to make progress. The hot AZ summers don't help.
Jul 22, 2012: Just an update to say there is no update. I haven't even opened the door on the Burbn since the last update although I have been thinking about getting it running.
Oct 31, 2015: Went to see the Burbn for the first time in several years. No change just dustier and the roof is rusted now. Hooked up the jumper cables and it turned over. I think I will take the T/A battery and some tools and try to start it tomorrow. I think it may just be the injector. It coul also be a clogged fuel line. I will try to verify that it is getting fuel to the injectors. Would be so much easier if it was sitting in my driveway.
July 23, 2017: Finally got around to spending some quality time with the Burbn this weekend. Making a serious attempt to getting it running again. I need a backup vehicle to my '92 Yukon daily driver and I'm thinking about doing a super road trip in the Burbn in the fall.
Anyway, I tried starting it again and like before if I dump fuel or starting fluid directly into the throtle body it starts right up. I checked the fuel pump solenoid which is mounted on the firewall. With the key in the Run position on I saw power on the orange wire which is powered all the time. While cranking I saw that have power on the green/white wire. I never did see power on the tan/white wire which goes direcvtly to the fuel pump.
I tried running a jumper from the orange wire to the tan/white wire which should have directly powered the fuel pump. Nothing. I don't think I've ever heard that fuel pump run since I put it in. I remember when installing it (around 7-8 years ago) I had a hard time connecting everything to the fuel tank and fuel pump, wires, fuel lines, and not pinching anything since it is all on the top of the fuel tank right against the rear bed bottom. I now see now why so many people cut a fuel pump access door into their trucks. I also remember when I was installing the new fuel pump I had some issues with the electrical bulkhead connection that goes from outside to inside the fuel tank to power the fuel pump. I checked and with the jumper I was seeing 12V all the way to the fuel tank. I also checked that I had a good ground connection. Seemed like I may have a bad fuel pump or a bad connection. Either way hard to diagnose and fix while it is in the truck (except if you had one of those fancy access doors) so I pulled the fuel tank again. This is the second time I'm pulled it laying in the gravel in the storage lot where I keep the Burbn and my trailer. It was about 105 debrees today and the humidity was higher than usual for here. Got it home and the tank is now sitting on my back patio and the fuel pump/sender assembly is on my workbench waiting to be fixed. I've tried powering the fuel pump directly on my workbench and never heard it do anything. I will probably order everything new from Rock Auto. About $300 for all new AC Delco parts: entire fuel pump and sender mechanism, fuel filter, hanger straps, new locking ring, etc.
Found a wiring diagram of the fuel pump
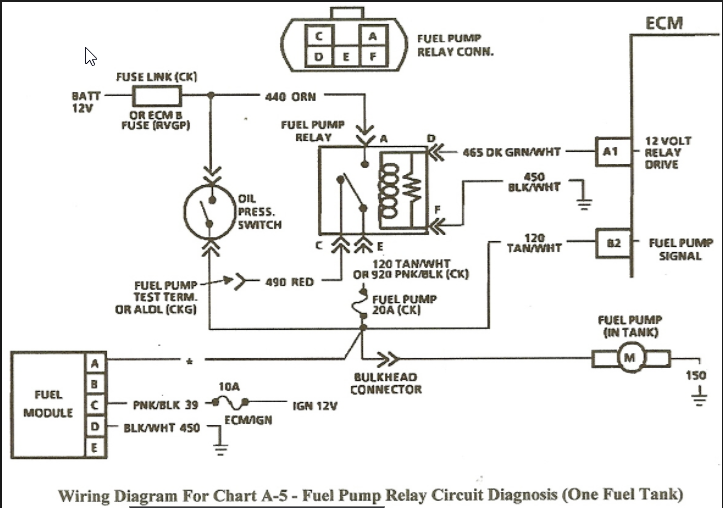
July 30, 2017: Ordered new fuel pump with all new hanger assembly and harness, fuel tank hanger straps, and fuel filter from Rock Auto. About $200 for everything. Parts arrived in about 3 days. Cleaned out the tank. In the bottom of the tank I found a mess of varnishy goop. Now I wish I had listened to my dad who was religious about treating gas with Sta-bil anytime something was sitting for an extended period. Cleaned the inside of the tank with acetone, brake cleaner, rags. I also found a clip in the tank I guess from the old fuel pump. Fished that out. Put the tank back together and installed it. At first I had no power to the pump so I jump the orange to tan/white line on the fuel pump relay and got power. Burbn started right up with the jumper. Wohoo! Removed the jumper and tried again and again it started right up. Burbn is alive after and running for the first time since around July 2010. Need to get it home and do a full service: wash it inside and out including dusty engine bay, oil, filter, air filter, rotor, distr cap, plugs, wires, PCV valve, fuel filter (I didn't install the one I got from Rock Auto yet), trans fluid, check brakes, etc. I also need to raise about 2" to clear those big tires. Paint needs some attention too.
New To Do List
Aug 5, 2017: Spent the day working on the Burbn again today. Got the fuel tank the rest of the way installed and drove it around the lot a little. I took tranmission fluid to top it off but forgot to take a funnel so couldn't drive it too far. Bought a 7 gallon air tank and aired the tires up some but ran out of air before I got them all the way up. Tried the A/C and the compressor clutch never did engage. Hoping it is just low on refrigerant. Also replaced a few vacuum lines. Looks like I need to do all of them as they are just all crumbling. Tried all the windows and they all roll down except the driver's. Seems like it might be stuck or might be a bad switch. Seems like it is trying to roll up but not down. Power door locks don't seem to be working - again, might be the switch on the driver's door.
Aug 19, 2017: More Burbn update. Last weekend I had worked on the A/C. The compressor was not turning on. I found that if I ran 12V directly to the compressor it would run. I tried jumping the low pressure switch on the back of the receiver/dryer the compressor would turn on. Good! With the compressor running I added more refrigerant and eventually got it to turn on without the low pressure switch jumped. Good! With it running I added refrigerant until it was full. Seemed like the air was blowing slightly cool but not sure because the compressor/clutch/belt started squealing loudly. I was afraid I would damage the almost new compressor so I wouldn't let it run. Read online that it may just be the belt so I will look into getting a new belt (need to replace it anyway).
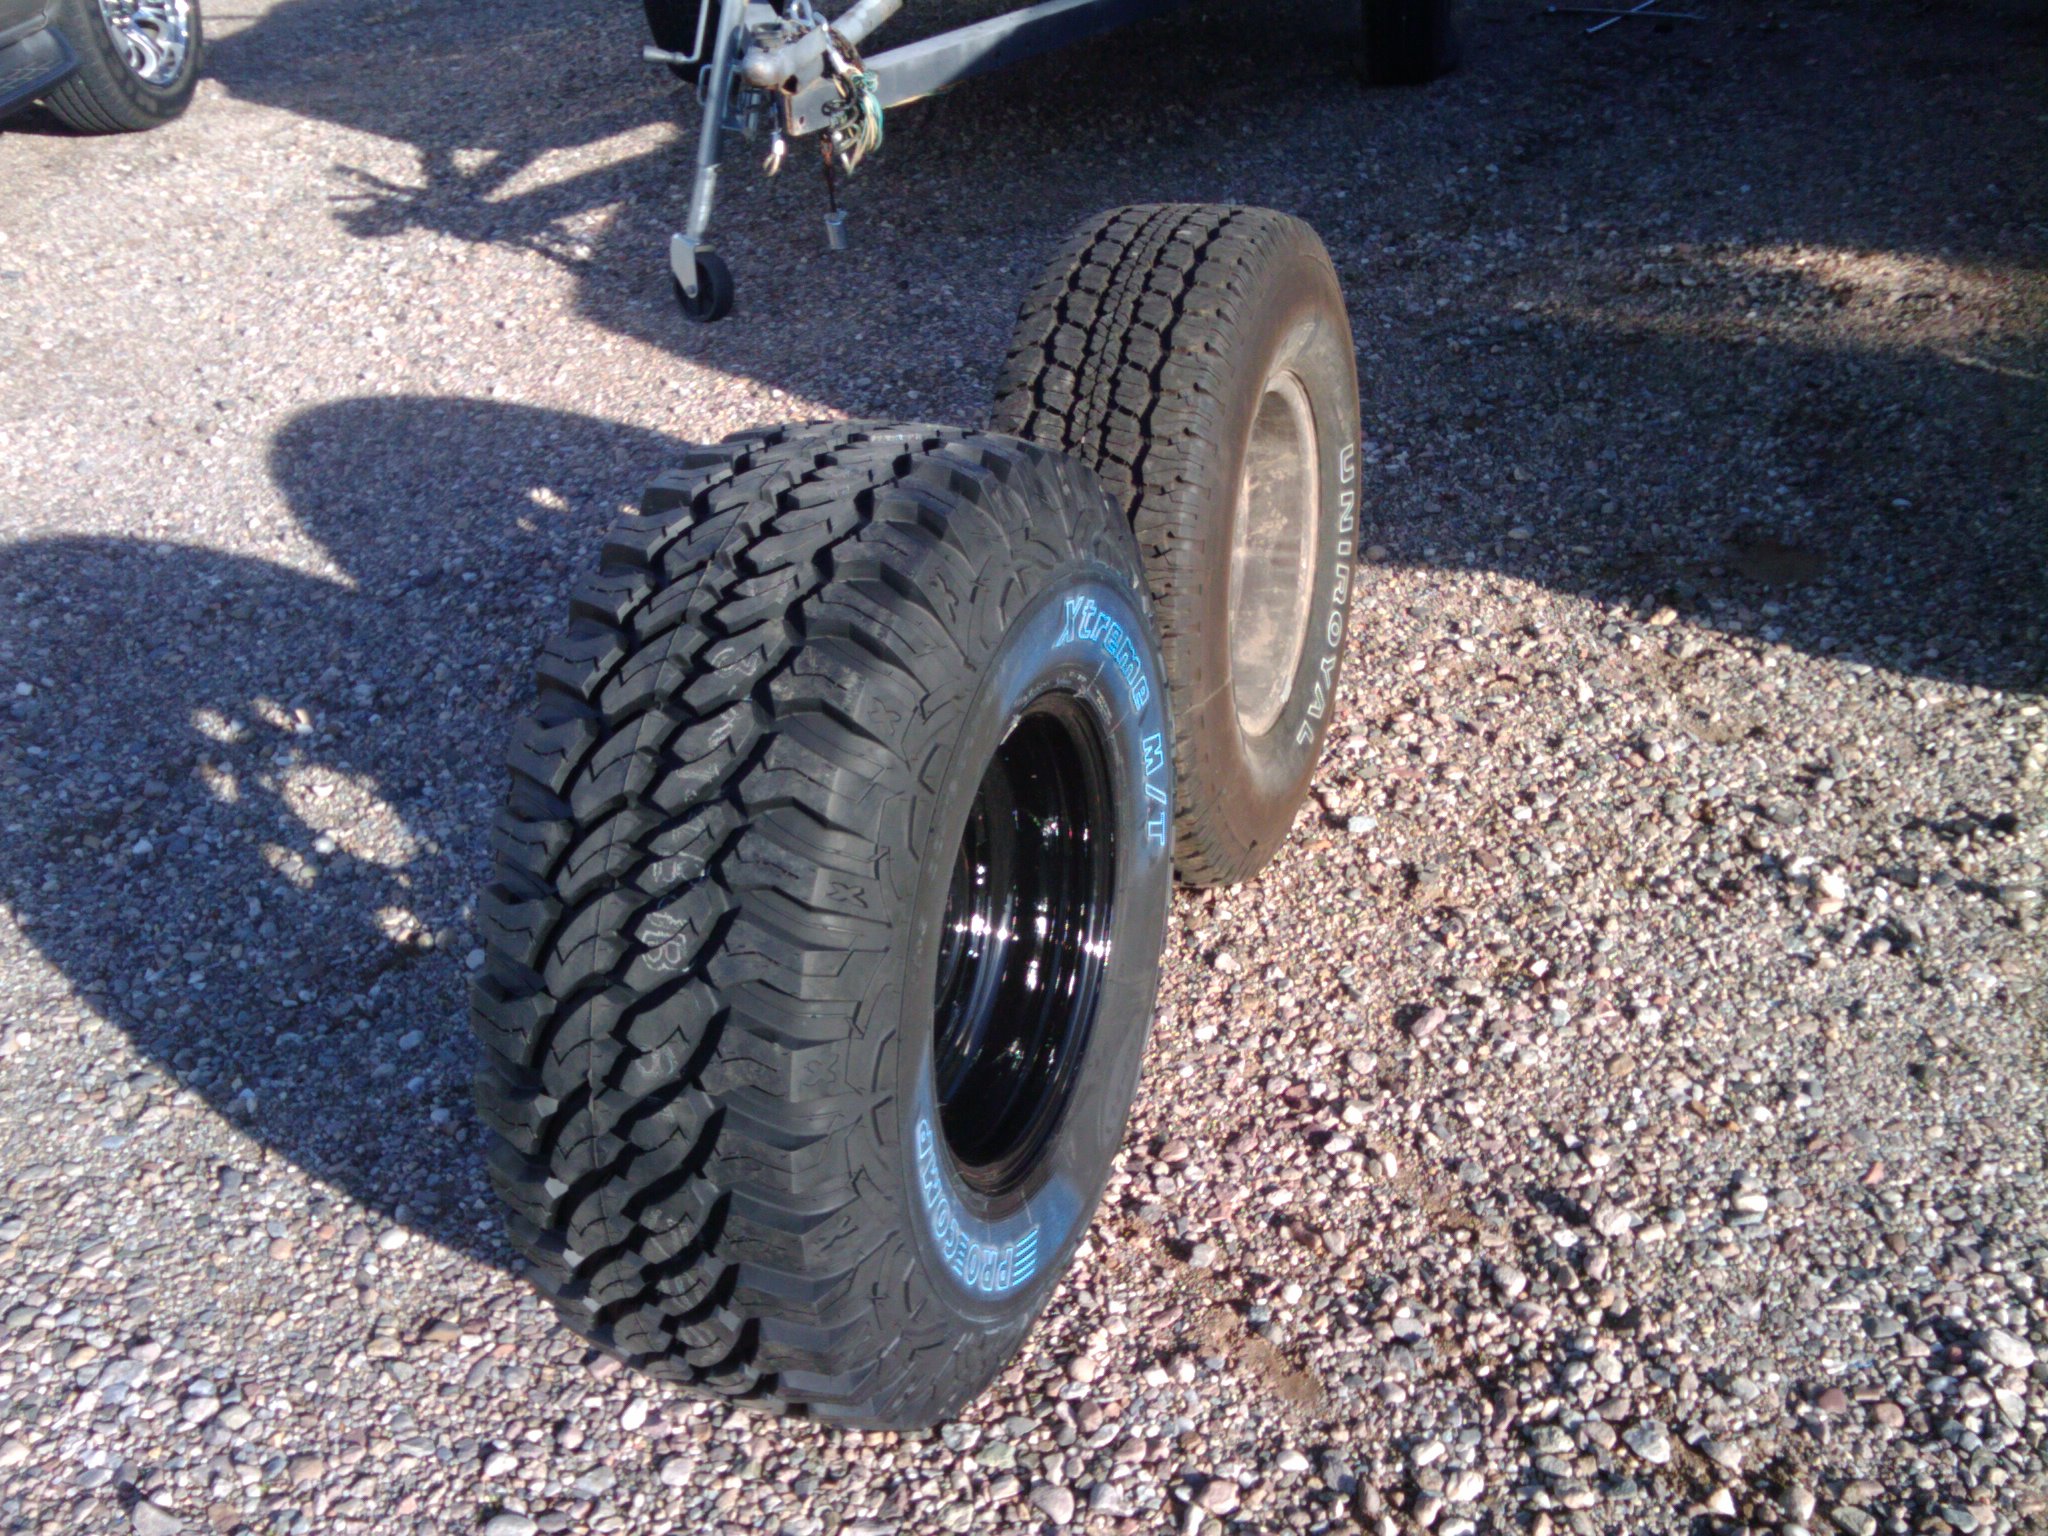
Took it out on the road and immeditaly felt a violent vibration. I couldn't even go 20mph. Pretty sure my alomost new tires have permanent flat spots on them. I paid about $1300 for those wheels and tires in 2010 and the tires only have about 20 miles on them. I think they are ruined. Put the wheels/tire that were on the Yukon on there. (Mickey Thompson Classic IIs 16x8 6x5.5 lug spacing, 3-3/8\" backspacing and BF Goodrich 265-75-R16 Tires). Found that I couldn't use the same lug nuts I originally had on the Yukon because the Suburban has smaller wheel studs than the Suburban. That seems weird. I tried using the lug nuts that were on the big mudder tires and steelie wheels but my lug wrench would not fit inside the wheel to tighten the lug nuts! Went home and found the original stock Burbn lug nuts and used those. So now I have the M/T wheels and the worn out BFG tires. Drove it on those tires and it seemed fine.
Need to get new tires. Deciding whether to keep the Mickey Thompson wheels or go back to the stock Burbn wheels which I still have.
Aug 27, 2017: Drove the Burbn home last weekend. Messed around with it a litle here and there but didn't get much done other than an oild and filter change due to crazy work schedule. Aired the big mudder tires up and let them sit in my 110 degree garage with no load on them for a week. Put them back on the Burbn on FRiday and took it for a drive again. Still undrivable due to the flat spots. Looking at them you can't tell. Gave up on those tires and started looking for new tires. Was torn between 33x12.5 All Terrain tires on the black steelie 15" wheels which would require a lift due to rubbing. Decided I shouldn't take on any more projects right now and who knows other issues the lift would introduce. So looked into tires for the 16" Mickey Thompson wheels. Found that 285x75x16 wheels are like 32.8" wide by 11.5" wide. Not much smaller than the 33x12.5. Took the chance and got BF Goodrich AT from Big O. Have driven about 10 miles on them including turning lock-to-lock and going over dips and speed bumps and so far so good - no rubing at all! They look good too. Tried to charge the A/C a couple of times. Never did get it to blow cold. Also would have an occasional squeal from the compressor. Also the accumulator was always really hot. Can't hardly get by without A/C here in Arizona so I gave up and took it in and let a shop fix it. New conpressor and evac and charge was $700. The evac and charge cost almost as much as the compressor and labor to put it on! Anyway, I have cold A/C now. I'm thinking I will drive it to work tomorow.
Dec 17, 2017: Since my last update the Suburban has pretty much been my daily driver. In fact I drove it across the country and back on my sabbatical from Sept 4 - Oct 23. It blew the transmission cooler before I even got out of town but it just sprang a leak in the hose right on the end. I pulled into Queen Creek Kohl's parking lot under a tree and fixed it by cutting off the end of the rubber hose and putting it back on. It has been on there since then with no issues. When it blew it sprayed transmission fluid all under the hood and soaked the hood felt insulation pad. Also sprayed transmission fluid all down the passengers side of the Burbn.
On my sabbatical I drove from Arizona to Indiana with my dog and cat along for the ride. After the first night in a hotel I came out to find the A/C blower wouldn't turn on. Luckily we had made it out of Arizona so we were able to ride the rest of the way with the windows just cracked. It got hot at times but we managed. Once I got to Indiana and got a new blower I also drove from Indiana to Myrtle Beach, North Carolina and back. I hung out down there with my son Wylie for about a week. At the end of my sabbatical I drove it back to Arizona with just the cat. I left the dog with my mom. I have been daily driving the Burbn since the Yukon is down for repairs. I mostly finished up the Yukon today so I should soon have two vehicles and can take the strain off of tbe Burbn.
Done List:
To Do List:
Wish List:
Specs (some from above VIN # decoding):
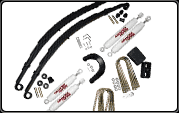
I think I may have found my lift kit at a decent price. It's a Rancho 4" lift from 4WheelParts.com (Part Number: RANR1219R5). Price: ~$625 although I'm pretty sure the 4 Wheel Parts guy told me on the phone it was something like $415. This kit includes:
I need to check out the following lift kit 'cause it's about $300 less than the Rancho kit:
I just saw the Rough Country 4" spring lift kit for $319. That's a great price. Kit includes:
Last updated dec 17, 2017